AIM device - User manual and quickstart (v3.0)
0 - Description and requisites
The AIM is an autonomous device for the Berard AIT method. It is composed by the device itself, the power adapter and a network cable.
The usage of the AIM is done by any network capable device. Could be any regular device starting from a smartphone to a desktop PC.
The AIM is usable from any modern operating system.
Special requisites are:
- Any recent version of a modern web browser. Our recommendation is to use the newest version of Mozilla Firefox.
- On Microsoft operating system versions, you need to install the Bonjour printing services crafted by Apple: https://support.apple.com/kb/DL999
1 - Quickstart
1.1 - WiFi connection. Just local use.
- Connect just the power cord, and turn on your AIM unit. Wait until the indicator sets steady green.
-
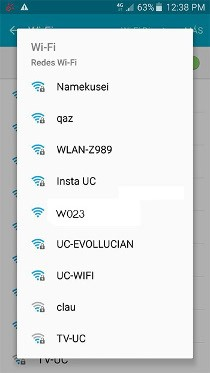
Connect your WiFi device (smartphone, tablet, whatever) to the WiFi SSID provided by your AIM.
For instance
aimXXXPlease note that the connection with the AIM doesn’t connect your device with the Internet. Maybe your device warns you about this situation, but do not worry about it, it’s ok.
-
Open your web browser and type the URL of your AIM unit.
For instance
http://aimXXX.local
1.2 - Wired connection. Both local and remote use.
- Connect both the power and network cords, and turn on your AIM unit. Wait until the indicator sets glowing in blue.
- Connect your device to the same network the AIM unit it’s in.
-
For local use, open your browser and type the URL of your AIM unit.
For instance
http://aimXXX.local - For remote use, open your browser and enter https://amp.aim-device.com. Login and check the connectivity of your unit. Enter on it once available.
2 - WiFi connection mode
This mode is available just for local use of the device.
-
Plug-in just the power cord to the AIM unit. The light indicator on your AIM will be flashing green. After some seconds it will turn steady green: at this point your device is ready to be used.
-
Your AIM unit emits a WiFi signal that allows you to manage it from any WiFi-able device, such as a tablet, smartphone, desktop PC or laptop PC. To establish a connection with your AIM unit and to be able to start using it, find for a new WiFi signal from the device of your choice. On the WiFi signals list it will be a new one with the same name as your AIM unit.
For instance
aimXXXClick on that WiFi signal in order to connect to it. A password is needed: type berardait and continue with the process. You can click on “Remember the password” (or the equivalent option) for your own convenience: this way the password won’t be asked again when you use your AIM unit again.
If everything has been fine, you should be connected to your AIM unit at this point.
Please note that your WiFi device may warn you that there is no Internet connection available. This is ok and there is no need to be worried about it.
-
Open the web browser of your choice and enter the URL of your AIM unit.
For instance
http://aimXXX.local
3 - Wired connection mode
This mode is available both for local and remote use of the device.
-
Plug-in both the power and network cords. The light indicator on your AIM will be flashing green. After some seconds it will turn glowing blue: at this point your unit is ready to be used.
-
To use the device locally, open the web browser of your choice and enter the URL of your AIM unit.
For instance
http://aimXXX.local/ -
To use the device remotely, open the web browser of your choice and enter the following URL in order to login to the AIM Management Platform: https://amp.aim-device.com/

4 - Using your AIM unit
4.1 - Music program selection screen
This screen allows to select and see the contents of the selected music set for client session. This is a sample of it:
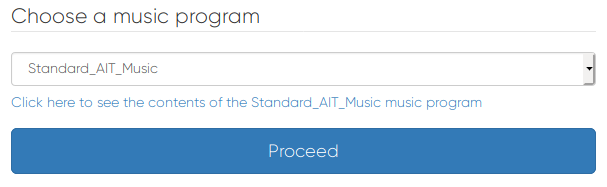
- Select the music program you need from the select box (currently there is only “Standard AIT Music” available).
- You can visualize the contents of each music program by clicking on the link below the selection box.
- Click on Proceed to continue with the programming of your session.
4.2 - Parameters selection screen
This screen allows the selection of the session number to be played, the initial volumes for left and right ears, and the frequencies wanted to be inhibited (muted). This is a sample of it:
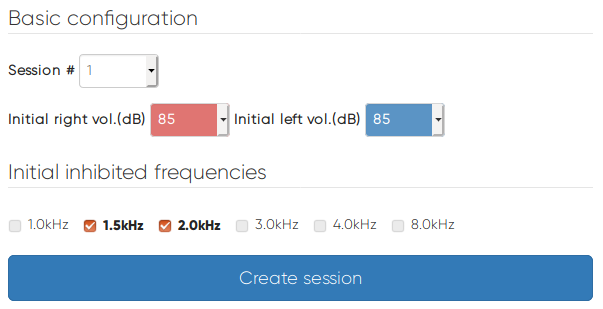
- Select session number between 1 and 20 (depending on the session number of the method you are about to start). Every session number lasts exactly 30 minutes.
- Select the initial volume levels for both ears, between 15 and 85 dBs.
- Select the frequencies you want to inhibit (mute) by clicking on the appropriate check boxes. You can only have 2 filters activated simultaneously, according to the Berard AIT method.
- Click on Create session to continue with the creation of your session.
4.3 - Session start screen
This screen will show you a brief summary of the selections you have made on the previous screens, and you will be able to start the session. This is a sample of it:
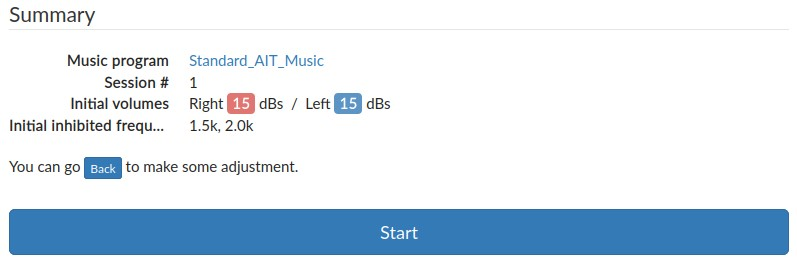
- In case you need to change anything you can click on Back in order to make some changes.
- If you are ok with the parameters, click on Start. Session will start automatically.
4.4 - Session screen
This screen will show you the session time and allow you to make some adjustments while session runs.
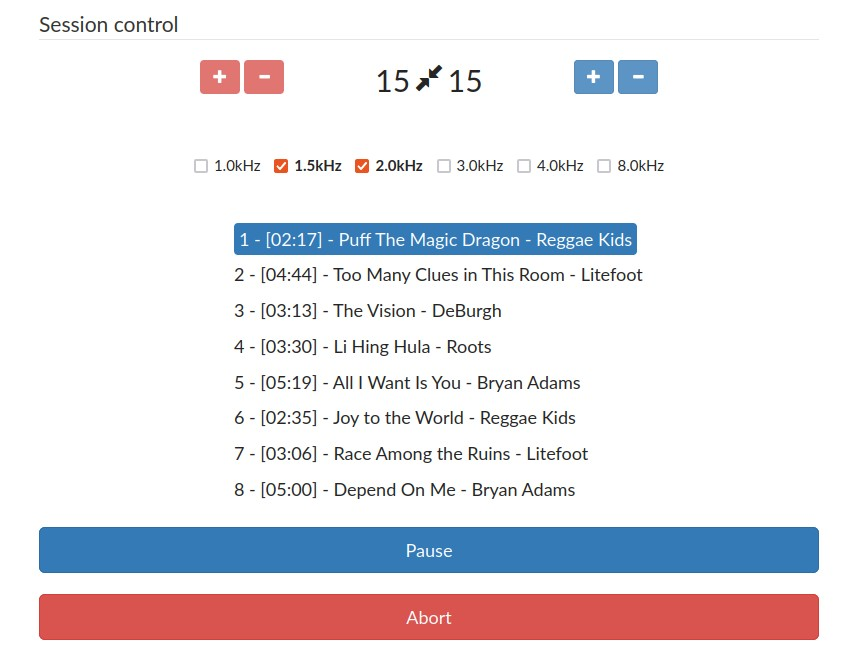
- When the session is running the indicator of your AIM unit will turn to glowing green.
- New control buttons appear up, and you will be able to change the current playing volume and the selection of frequencies inhibited.
- You will be able to pause the session, or even to stop it.
You can change the volume on both ears in parallel or independently, by using the icon located in between the decibel indicator:
Volume control for both ears: When the volume control is in this position, if you click on “+” (increase the volume) or “-“ (decrease the volume) on no matter the side you use, then both ears’ volume level will be affected.

Volume control independent for each ear: When the volume control is in this position, if you click on “+” (increase the volume) or “-“ (decrease the volume) the volume will be different for each ear, depending on the control of your choice.

- If for any reason you need to pause the session, click on Pause. This action pauses the session until you click on Resume.
- If for any reason you need to stop the session, click on Abort. This action stops the session immediately and sets you on the music program selection screen again.
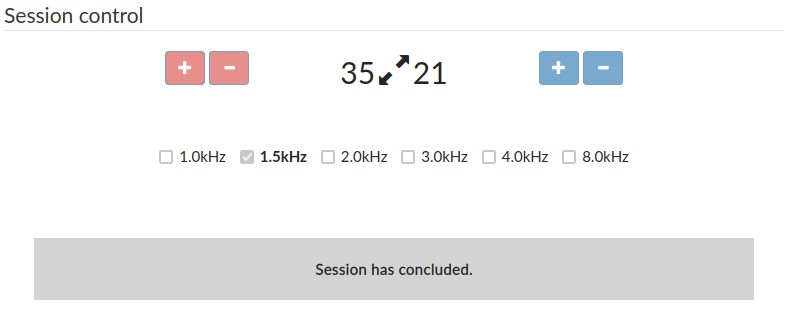
- When the session finishes, the indicator of your AIM will turn as it was before starting the session and the screen you are seeing will change. A message indicating that the session is over will appear and the session control items will be blocked, allowing you to see the differences between the initial and the ending parameters.
5 - Upper toolbar
This toolbar allows you to (from left to right):

- Home: go to the Music program selection screen directly, and program a new session from the beginning.
- Reboot: restart your AIM unit.
- Shutdown: poweroff your AIM unit.
6 - Color codes

Red color means:
- Steady when it starts the shutdown process.
- Flashing indicates that you can safely unplug the power cord.

Green color means:
- Steady when the system is ready to be used.
- Flashing indicates that the system is powering on but not ready yet.
- Glowing means the audio session is currently being played.

Blue color means:
- Steady when you login the system. It keeps this way while setting up the session.
- Flashing means your AIM is remote control capable.
7 - Maintenance and supervision
When any maintenance operation is needed for your AIM unit, it will be necessary you to connect it to the Internet through the network cable. Summary for this operation is:
- Notify to the support team about this maintenance operation in order to reserve a day/time gap in the supporting calendar.
- Ensure to be able to get a computer network appropriate in which you can connect your AIM unit: essentially an Internet router and a DHCP service (usual service on every Internet router).
- On D day, connect your AIM unit to your computer network using the network cable (RJ45 cord). If possible, connect it directly to your router.
The use of the AIM must be done only by Berard AIT official practitioners.
8 - Contact details
ATI Microson S.L. company at Derio, Bizkaia (Spain):
- Website: https://aim-device.com
- Email address: info@aim-device.com